July 7th, 2026
New
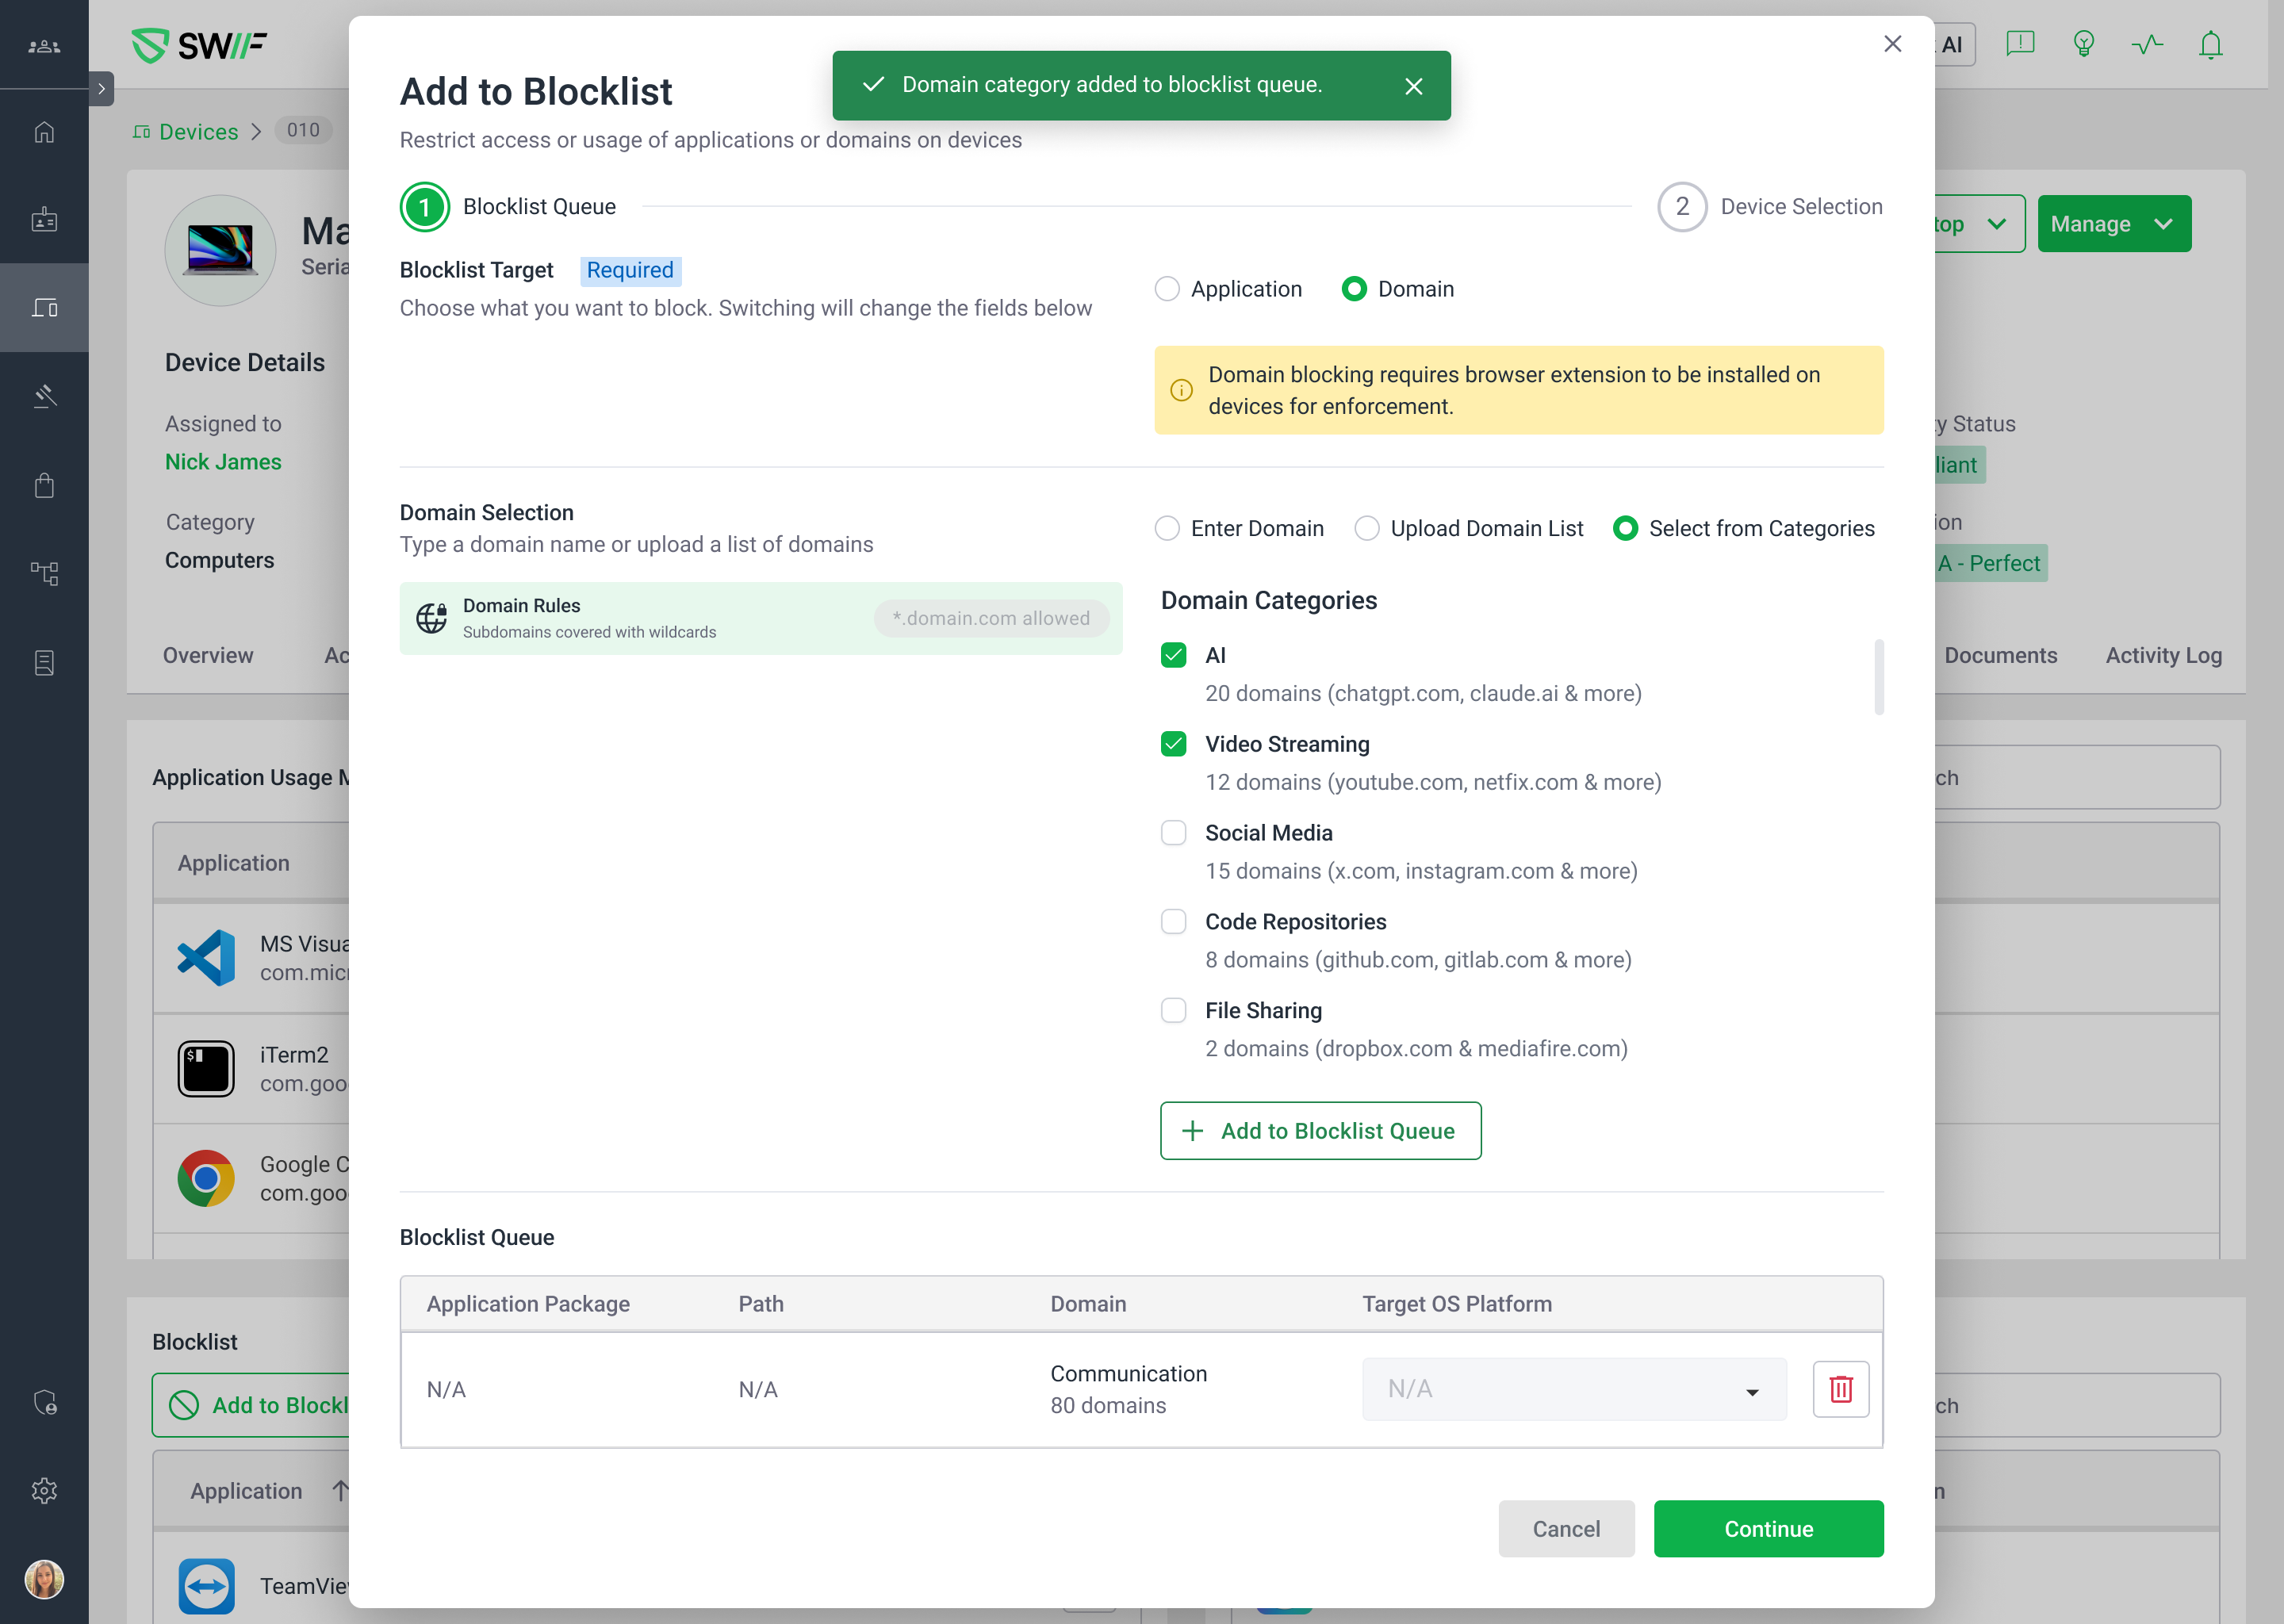
You can now block entire categories of domains at once — no more manually entering hundreds or thousands of individual domains.
What's new
When adding domains to your blocklist, a new "Select from Categories" option is available alongside the existing manual entry and file upload methods. Choose from 8 pre-populated domain categories:
How it works
Open Manage Blocklist and select Domain as the blocklist target.
Choose "Select from Categories" as the domain selection mode.
Select one or more categories using the checkboxes — each shows the number of domains included.
Click "+ Add to Blocklist Queue" and assign to your target devices or device groups.
Category blocks appear in Device Details → Apps → Blocked with a "Category" block type badge, making them easy to distinguish from per-domain or file-upload blocks.
Additional details
The "Block Sign-Up Only" toggle works with category selection — allow website access while preventing sign-ups to apps within blocked categories.
Category and per-domain blocks can coexist on the same device.
Subdomains within a category are automatically covered with wildcard rules.
Remove individual category blocks with "Allow," or clear everything with "Allow All."
This is especially useful for organizations enforcing compliance standards (ISO, SOC2, NIST) that require broad domain filtering policies.
July 1st, 2026
New
Released June 27, 2026
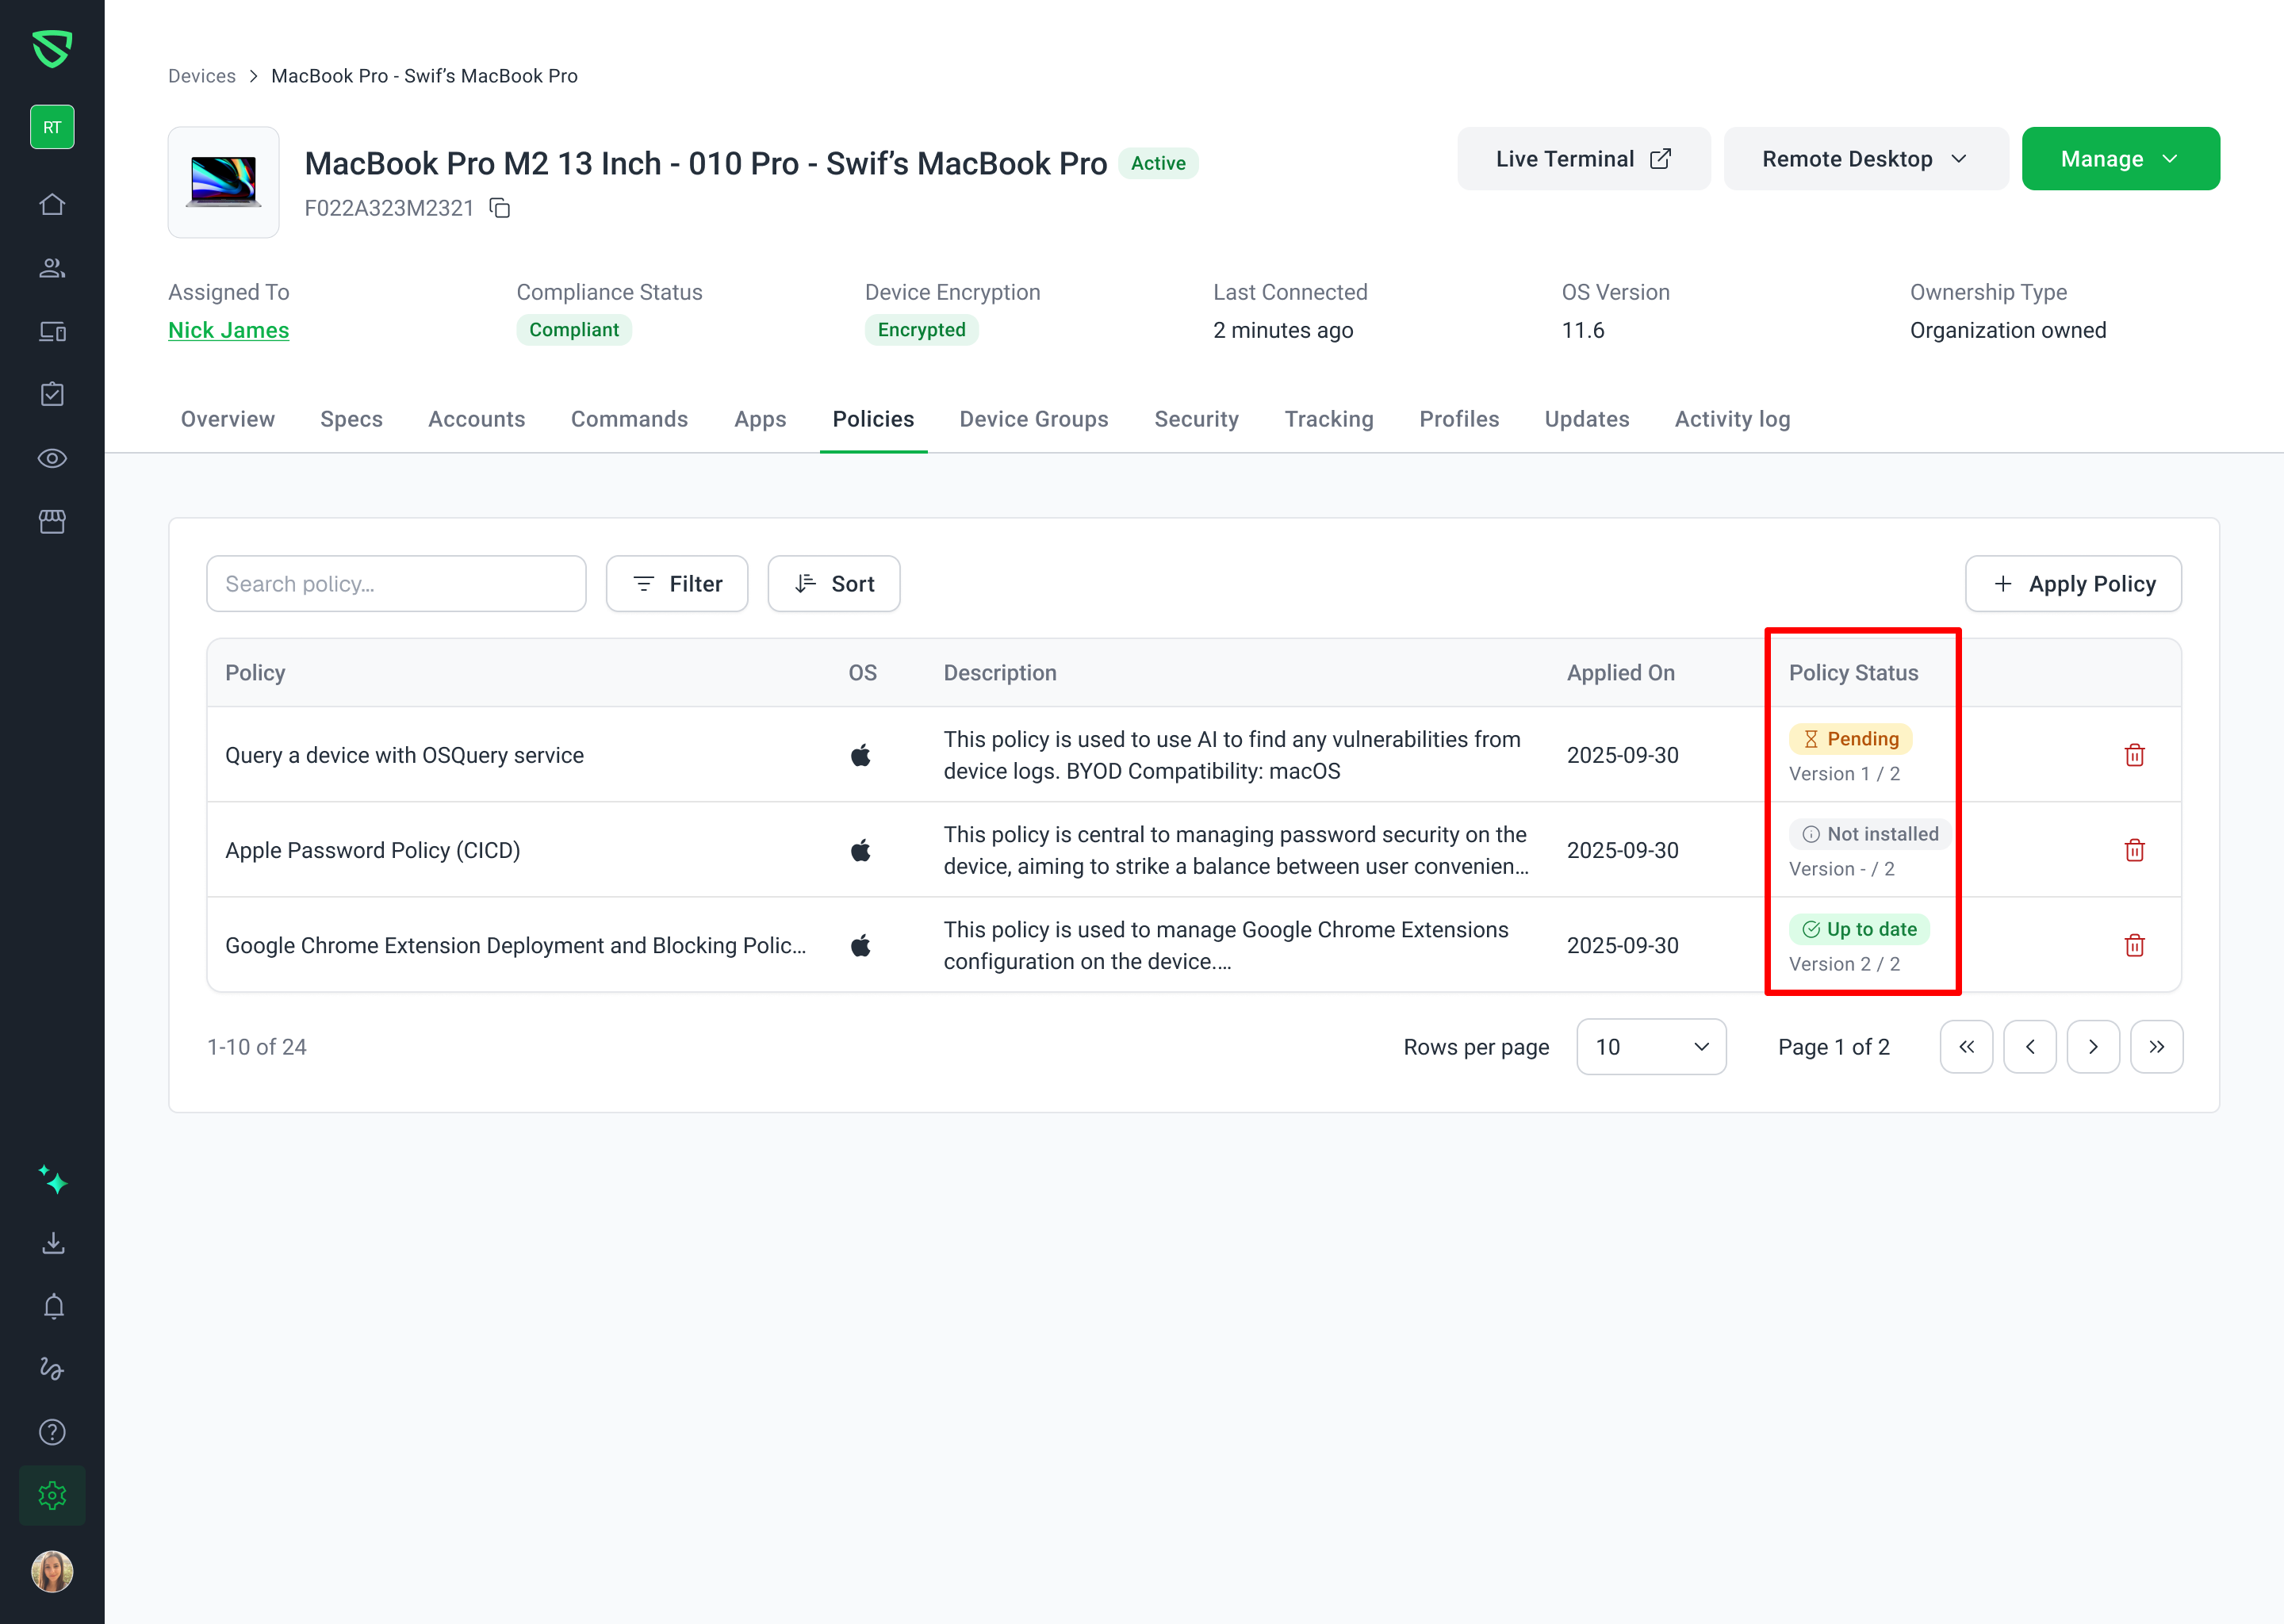
We've added new visibility into policy deployment status across your fleet. You can now see at a glance which devices are running the latest policy version and which are still pending.
What's New
Two new columns — Version and Policy Status — are now available in both the Device Details and Policy Details views.
Version shows the installed version vs. the latest available version:
2 / 2— device has the latest1 / 2— device is behind– / 1— policy has never been installed on the device
Policy Status gives you a quick read on each device:
Up to date — running the latest policy version
Pending — a newer version exists or the policy hasn't been installed yet
Where to Find It
Device Details → Policies tab — see version and status for every policy assigned to a specific device
Policy Details → Devices tab — see version and status for every device targeted by a specific policy
Both views stay in sync — the same device-policy pair shows consistent values regardless of which direction you're looking from.
Additional Details
Status updates in real time when you publish a new policy version
Works with device groups — each device in a group shows its own version and status
Fully compatible with search and filtering
No changes to existing columns or policy management features
Why This Matters
Previously there was no easy way to confirm whether a policy had actually been applied to a device. Now you can instantly identify which devices are behind and take action — no guesswork needed.
Learn more at Understand Policy Deployment Status and Version Reporting.
June 24th, 2026
New
What's New
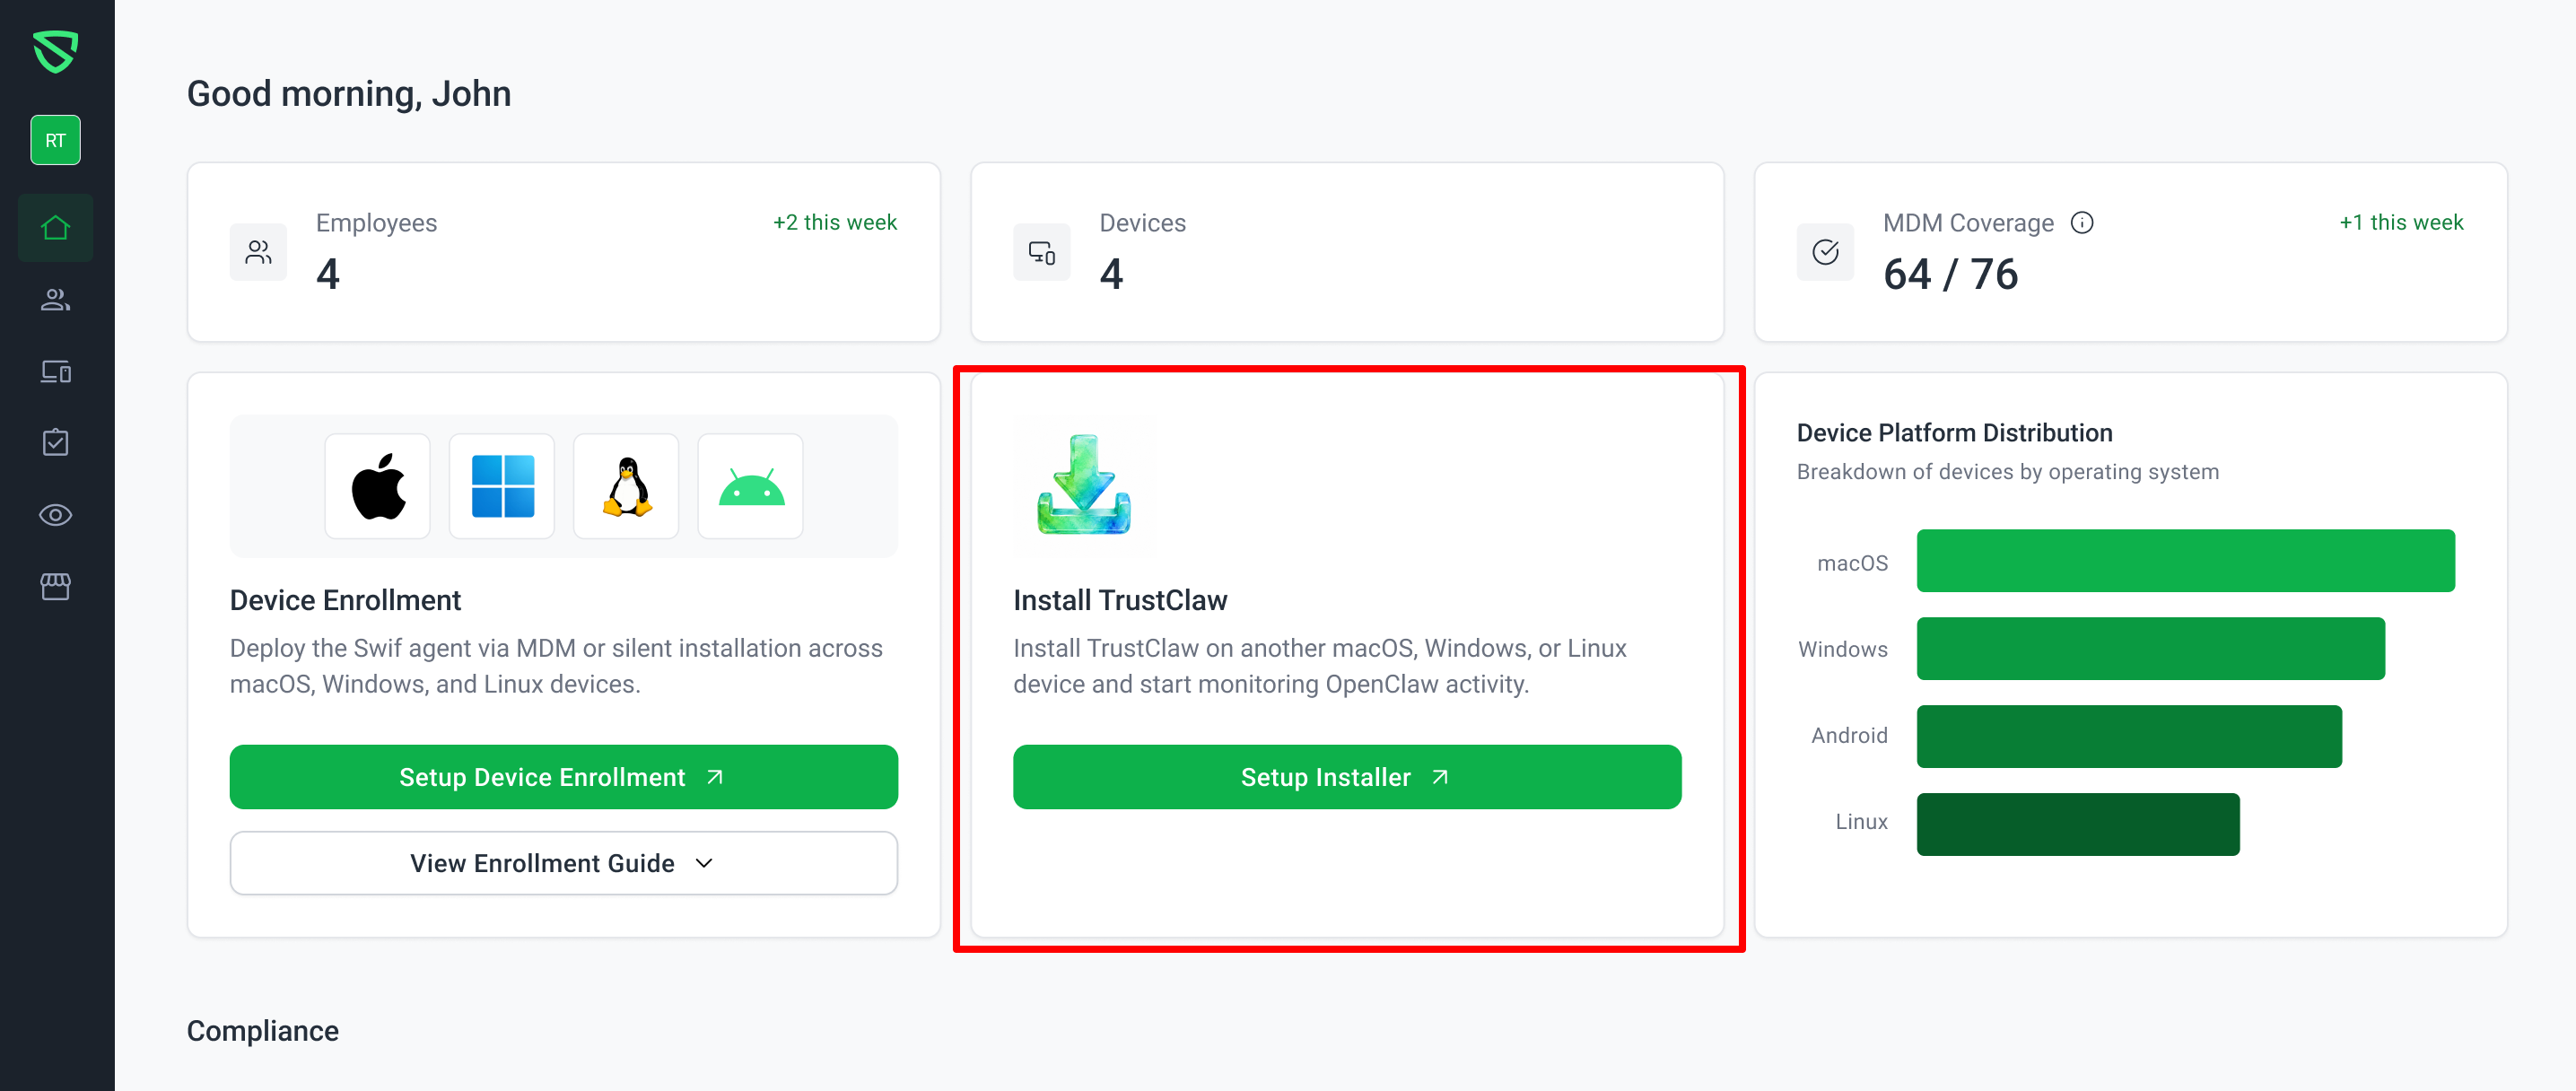
TrustClaw is now available for enterprise Swif organizations. Existing customers can set up TrustClaw directly from their Swif dashboard — no separate account or sign-up needed.
Highlights
Install TrustClaw card on Dashboard — A new card on the enterprise Home Dashboard provides a quick entry point to download and install the TrustClaw agent.
FTUX Setup Guide integration — A new optional step, "Monitor OpenClaw Activity with TrustClaw," has been added to the first-time user experience Setup Guide. This step is optional and does not block the completion of other setup tasks.
One-click installer modal — Clicking Setup TrustClaw from the Setup Guide (or the dashboard card) opens a modal where you can select your OS and download the TrustClaw installer.
Org-level completion tracking — Once any user in your organization clicks Download Installer, the setup step is marked as completed for all users across the org. The state persists across sessions and page refreshes.
How to Get Started
Log in to your Swif enterprise workspace.
Click the Install TrustClaw card on your Home Dashboard, or open the Setup Guide and find the TrustClaw step.
Click Setup TrustClaw → select your OS → click Download Installer.
Run the installer and follow the on-screen instructions.

For a full walkthrough, see our help article: Getting Started with TrustClaw for Enterprise
Not an Enterprise Customer?
Individual users can sign up for TrustClaw as a consumer — no Swif organization required. Get started here →
June 24th, 2026
New
Released: June 10, 2026
We're excited to introduce the TrustClaw onboarding experience for consumer users — a guided setup flow that gets you from sign-up to monitoring AI agent activity on your device in just a few minutes.
New Features
Dedicated TrustClaw Registration
Consumer users can now sign up for TrustClaw through a dedicated registration URL. New accounts are automatically identified as TrustClaw users and redirected to the onboarding flow — no manual configuration needed. Existing Swif business customers are unaffected and continue using their current sign-in flow.
Guided 4-Step Onboarding Flow
Step 1 — Onboarding Questions
A short questionnaire collects the information needed to personalize your TrustClaw experience. The Continue button activates only after all required fields are completed, so nothing gets missed.
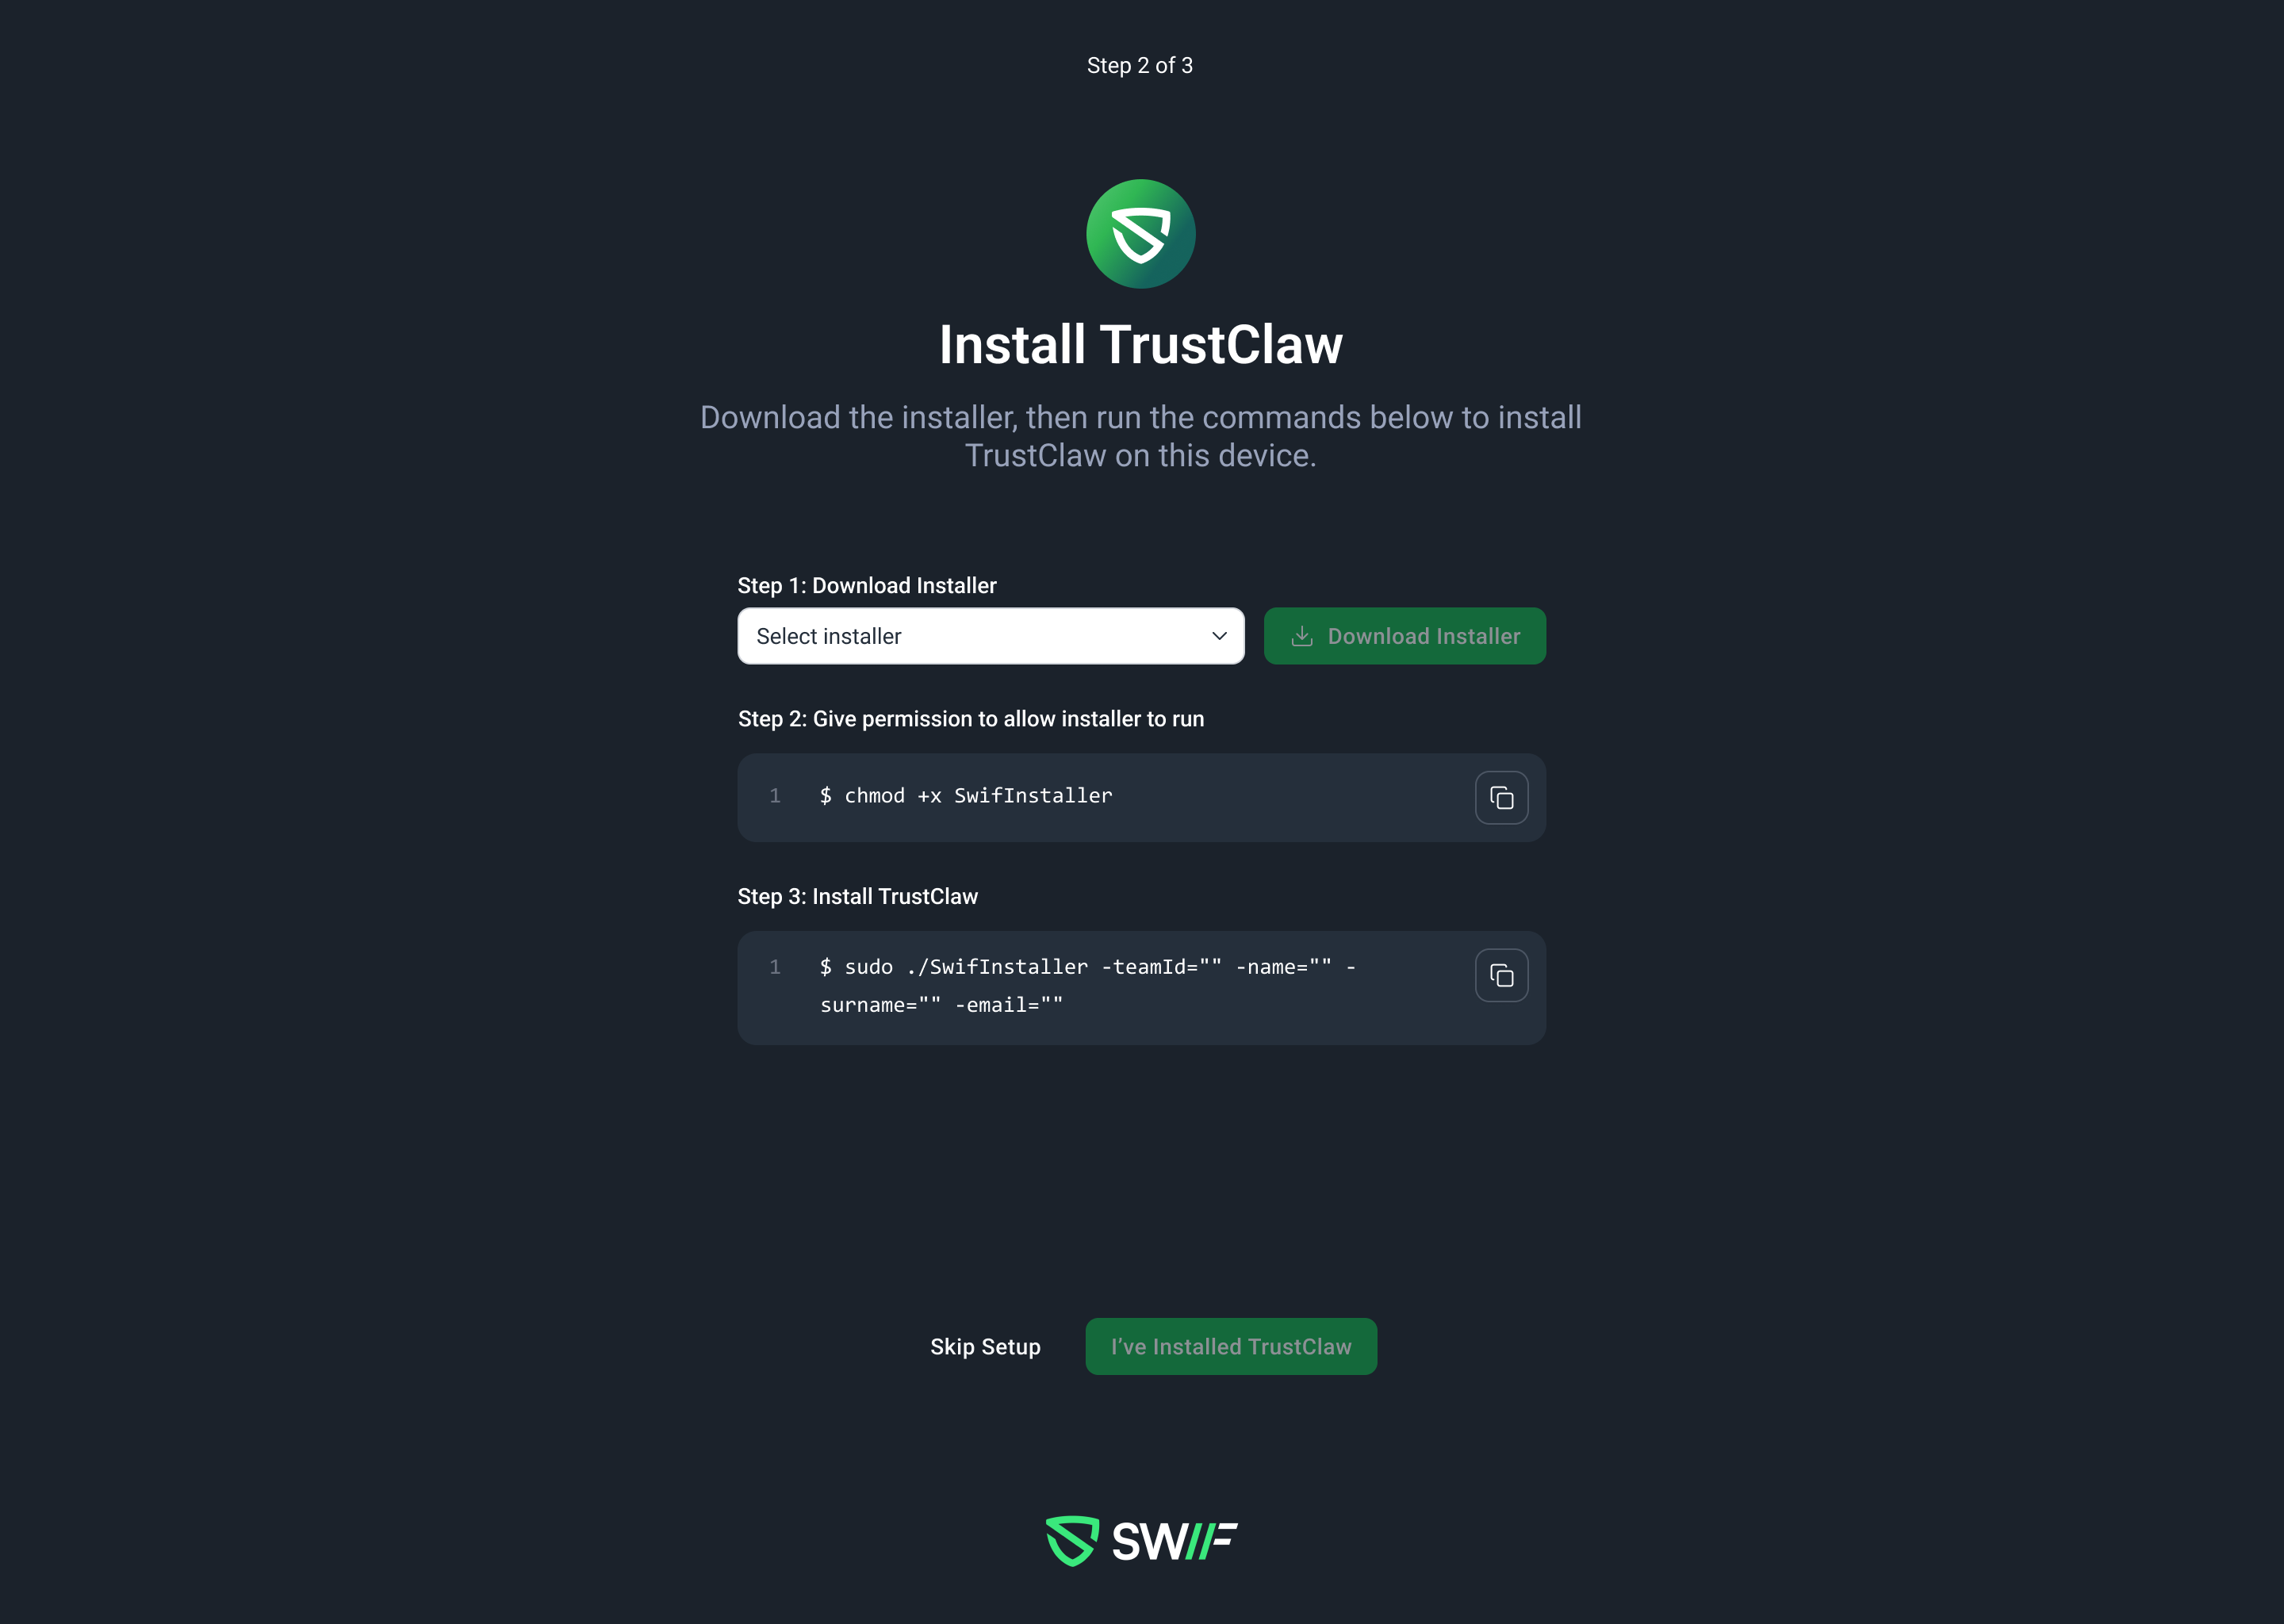
Step 2 — Install the TrustClaw Agent
Select your platform from the installer dropdown, download the agent, and confirm installation. Smart button states guide you through the process — Download Installer is disabled until you pick a platform, and I've Installed TrustClaw activates only after you've started the download. A Skip Setup option lets you jump straight to the dashboard if you'd prefer to install later.

Step 3 — Enable Monitoring Policies
Quickly enable the required monitoring policies with simple toggle switches — no need to navigate the full policy creation workflow:
OpenClaw Logging Policy — Enables audit logging for AI agent activity.
OpenClaw Config Tools Policy — Enables configuration and tool monitoring with a minimal profile.
The Continue button activates once the required toggles are enabled.
Step 4 — Success & Dashboard Redirect
A confirmation page lets you know setup is complete. Click View TrustClaw to go directly to your TrustClaw dashboard and start monitoring.
Technical Notes
TrustClaw consumer onboarding is independent of the existing Swif B2B sign-up flow. Existing Swif customers will receive TrustClaw access through a separate mechanism in a future update.
The installer currently supports macOS. Additional platform support is planned.
Policies are created on toggle — they do not require manual device assignment during onboarding.
For a full walkthrough, visit our help article: Getting Started with TrustClaw
June 24th, 2026
Improved
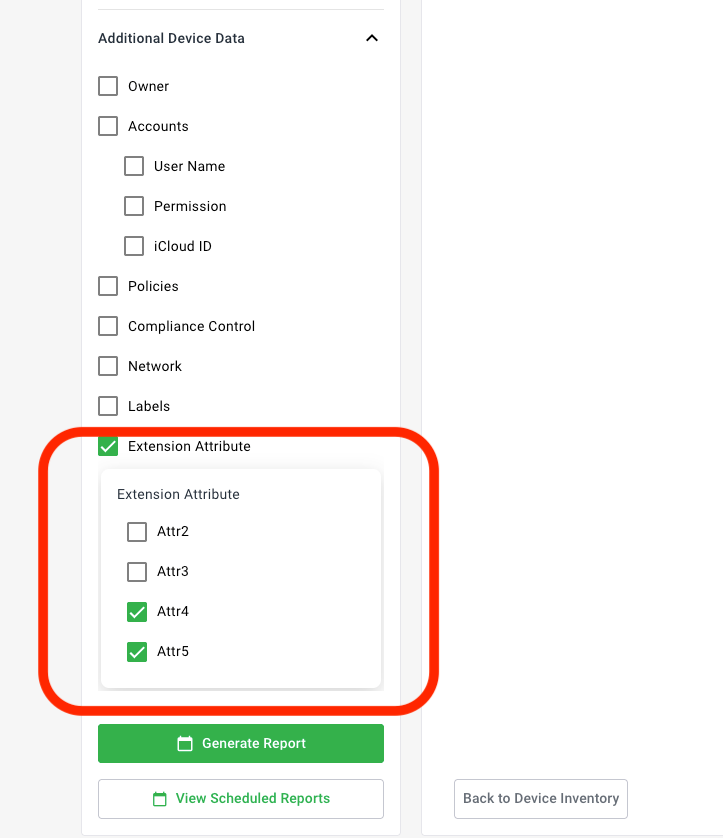
You can now include Extension Attributes as additional columns when exporting your device inventory reports.
What's new
Extension Attribute option added under Additional Device Data in the Report Export dialog
Attribute picker lets you select exactly which extension attributes to include — such as Asset Tags, Disk Size, or any custom attributes your organization has defined
Selected attributes appear as additional columns in both CSV and PDF exports, appended after the standard device columns
Column order matches your selection order
Persistence & scheduling
Your extension attribute selections are automatically saved as part of your report configuration. This means they carry over to:
Scheduled reports (daily, weekly, monthly)
Email-delivered reports
Slack-delivered reports
Re-opening the export dialog will restore your previous selections — no need to reconfigure each time.
Supported device categories
✅ Computers (Laptops & Desktops)
✅ Smartphones (Phones & Tablets)
How to use it
Go to Inventory → select your device category
Open the Report Export dialog
Under Additional Device Data, enable Extension Attribute
Select the specific attributes you want included
Click Download — your report will include them as separate columns
📖 Full guide: Exporting Device Report to CSV — Extension Attributes
June 16th, 2026
New
June 15, 2026
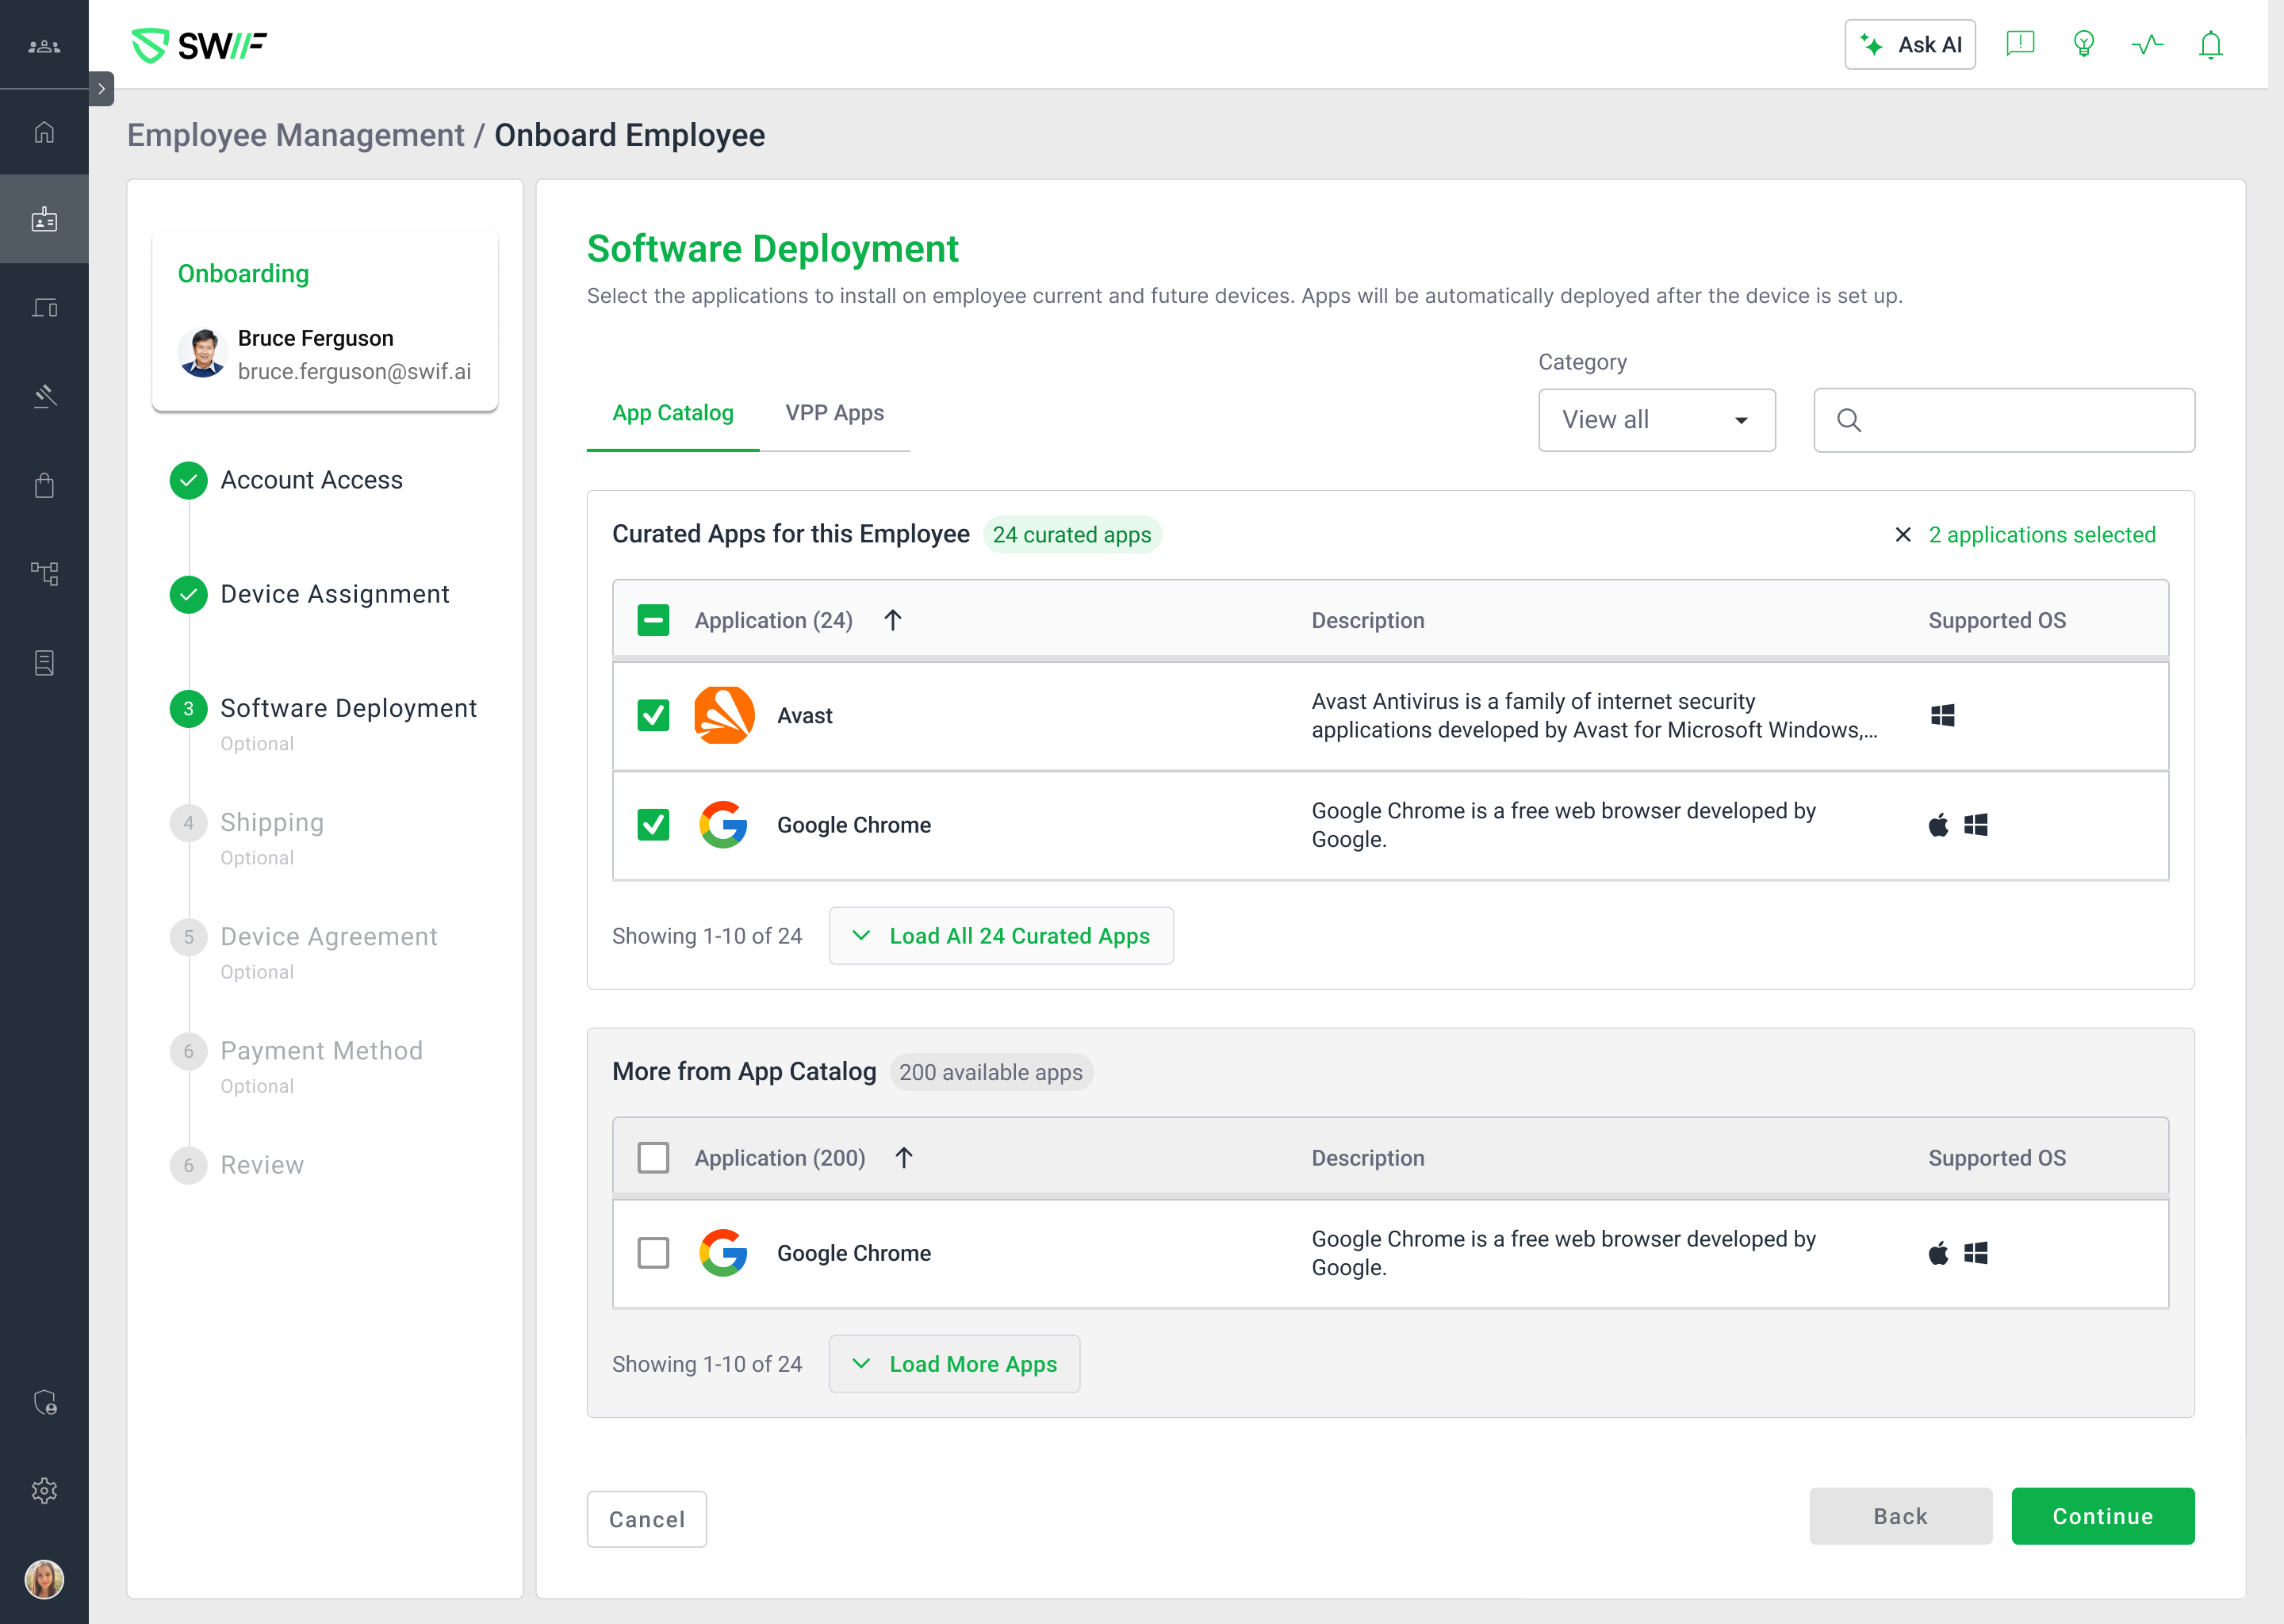
Admins can now deploy and remove software directly within the IT onboarding and offboarding workflows — including full support for Apple VPP apps.
What's New
Software Deployment During Onboarding
A new optional Software Deployment step appears after Device Assignment in the onboarding flow. Admins can browse the App Catalog and select applications to be scheduled for installation on newly assigned devices.
For Apple devices, a dedicated VPP Apps tab surfaces volume-purchased apps alongside the standard catalog — so you can provision licensed software in the same step. Apps with no remaining licenses are still visible and selectable for future fulfillment.
Software Removal During Offboarding
A new Software Removal step appears after User Deprovisioning. Admins can expand each assigned device, review installed apps, and queue specific applications for uninstallation. If an employee has no assigned devices, the step shows a clear empty state rather than requiring manual investigation.
Employee Details — Assigned Software
The Employee Details view now includes an Assigned Software section that consolidates all apps scheduled or installed across the employee's devices — both App Catalog and VPP — in a single view.
Onboarding Templates — Curated Software Lists
Under Settings → Onboarding Templates, admins can now pre-configure which App Catalog and VPP apps appear in the Software Deployment step. This lets you standardize app provisioning per role or department without manual selection each time.
VPP Naming Consistency
The "ABM Applications" tab across the product has been renamed to VPP Applications for clarity and consistency with Apple's current terminology.
Review Pages Updated
Both the onboarding and offboarding Review pages now include dedicated sections summarizing software deployment and removal selections before the workflow is finalized.
Why It Matters
Previously, software provisioning was handled outside the onboarding/offboarding workflow — requiring separate steps, manual coordination, and no single view of what was deployed. This update brings application lifecycle management directly into the employee workflow, reducing missed steps during onboarding and ensuring clean software removal when employees leave.
June 12th, 2026
Improved
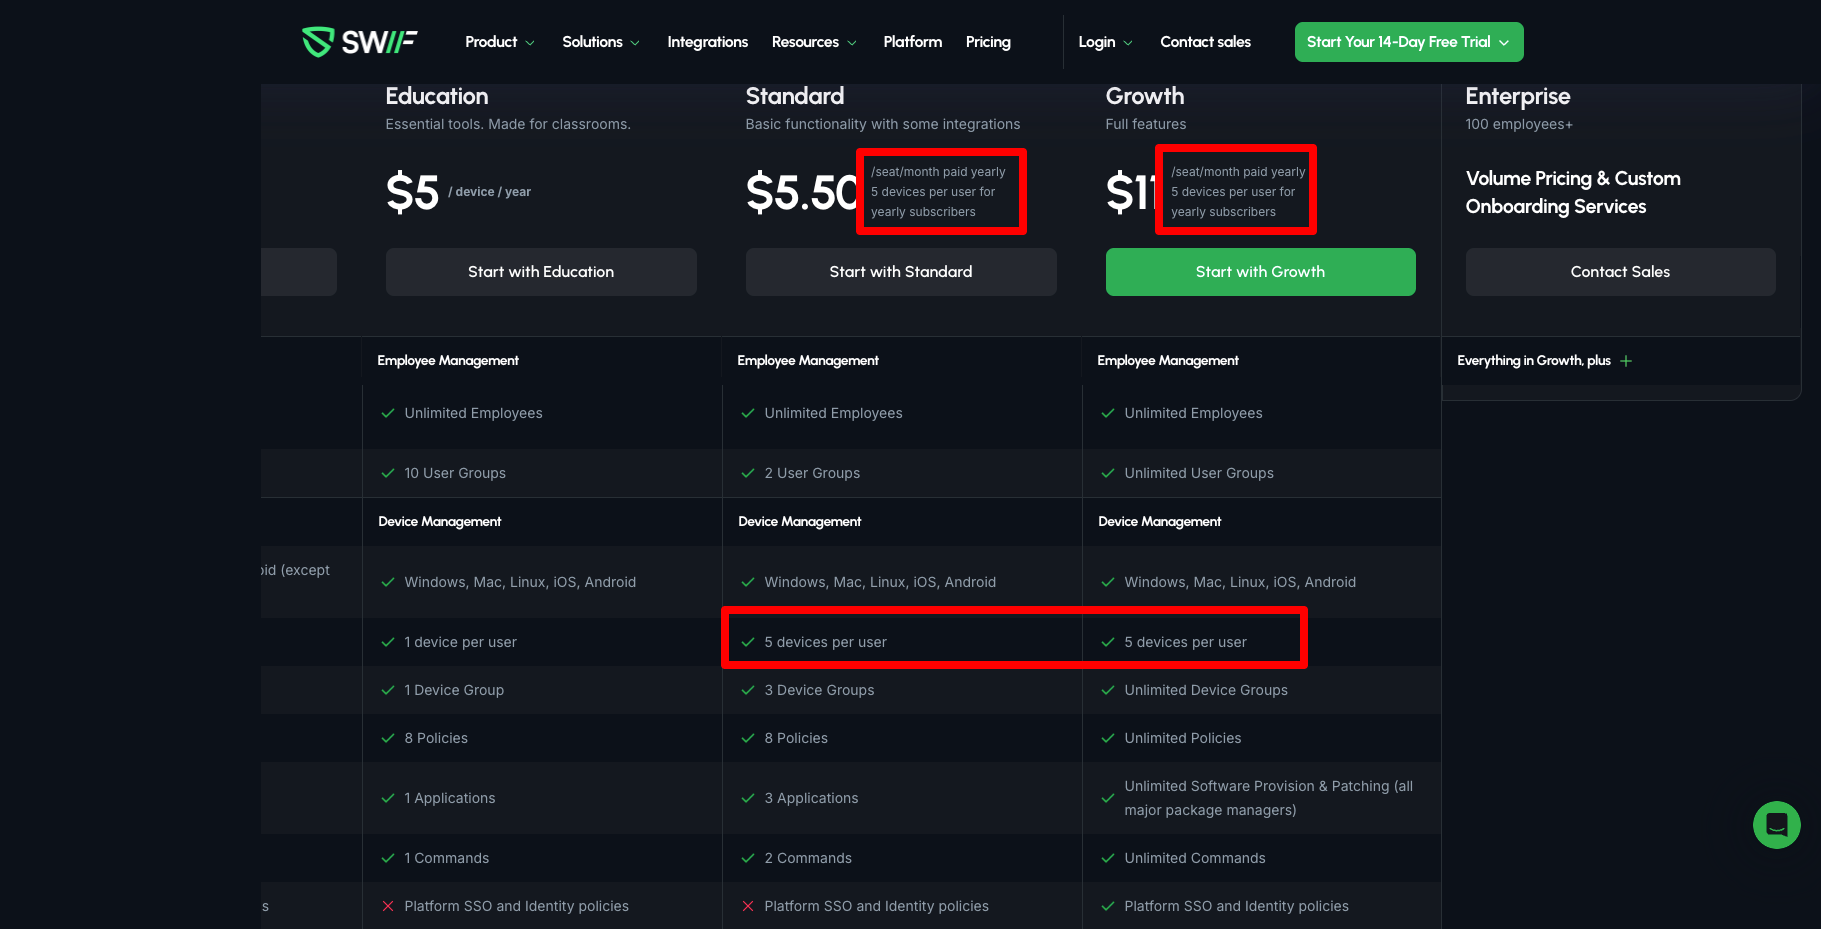
We've introduced per-user device assignment limits for Standard and Growth plan subscribers to provide clearer plan boundaries and a more predictable experience.
What's new:
Monthly subscribers can now assign up to 3 devices per user.
Yearly subscribers can now assign up to 5 devices per user.
How it works:
When you reach your plan's device limit for a user, the app will display a clear warning and prevent additional assignments.
This applies to both manual assignments in the web app and automatic assignments during device enrollment via the installer.
The Billing Plan page now clearly displays your plan's device-per-user allowance so you always know your limits at a glance.
Assignments within your limit continue to work exactly as before — no action is needed on your part.
June 10th, 2026
New
Desktop App v1.0.172
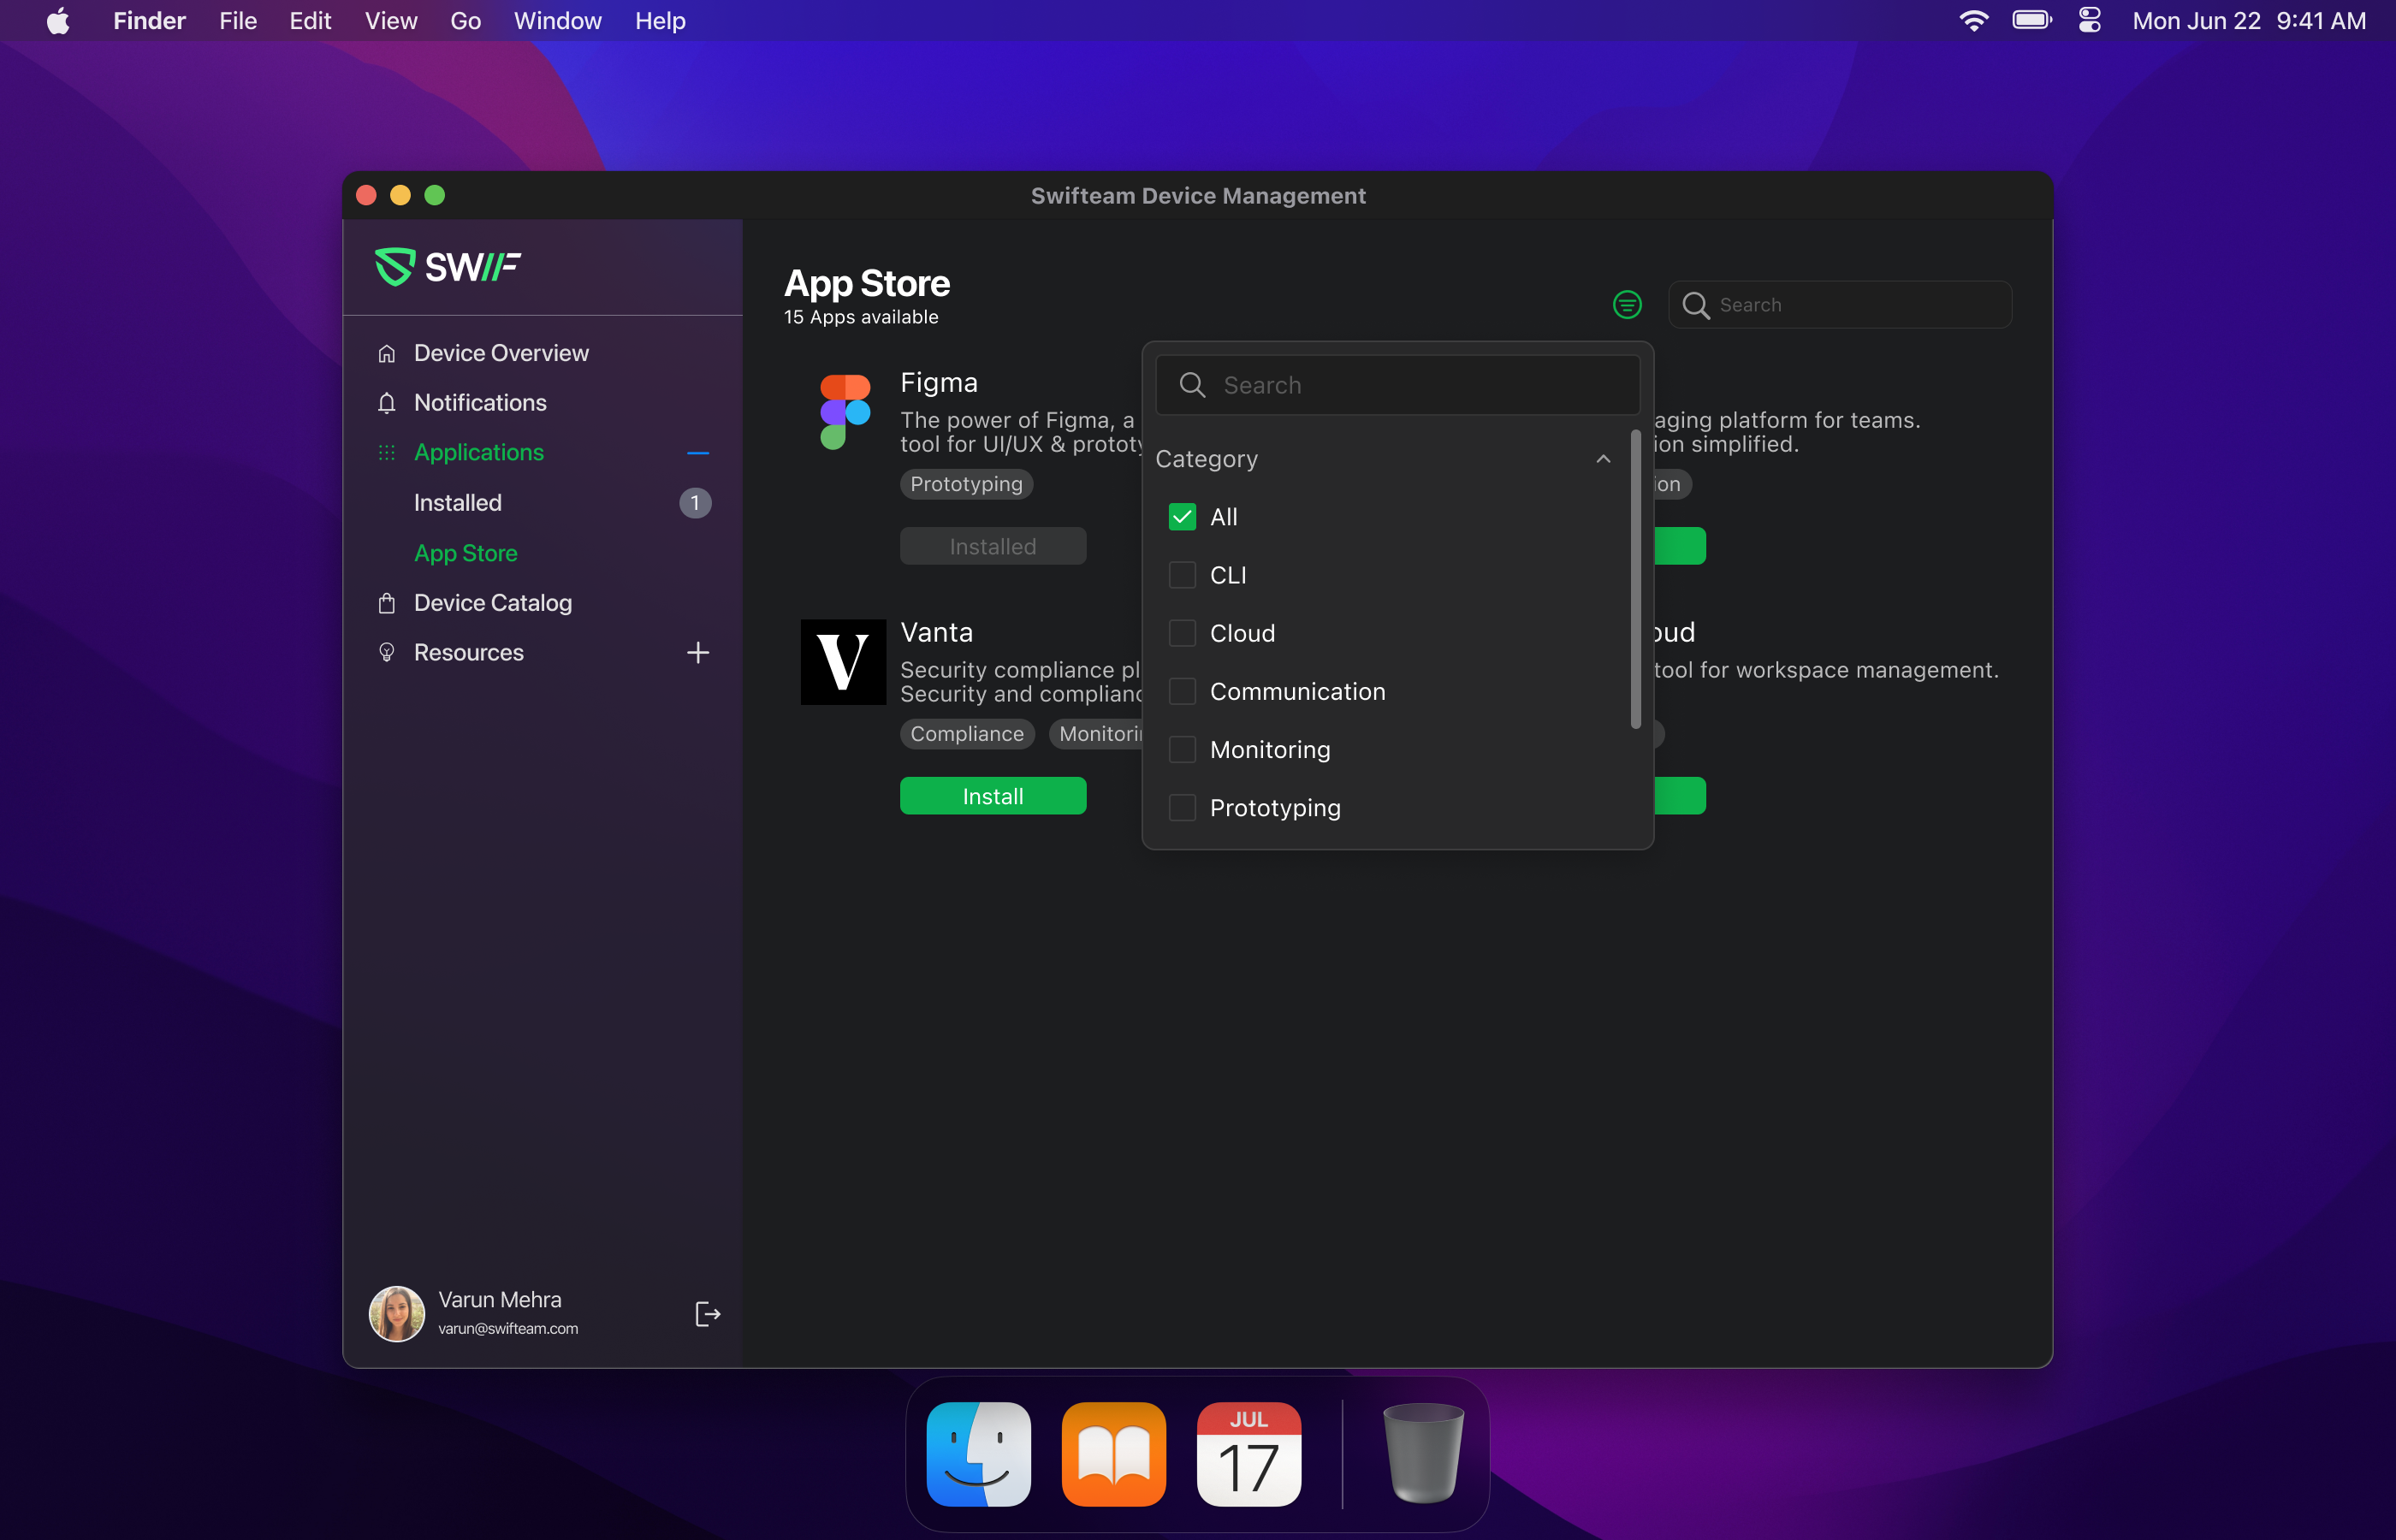
Finding the right app in the self-service app store just got a whole lot easier. You can now browse and filter apps by category — no more scrolling through a long, unorganized list.
What's new
Category chips on app cards — Each app now displays a category label (e.g., "Communication," "Security") directly on its card, so you can see at a glance what type of app it is.
Category filter bar — A new filter bar at the top of the app store lets you quickly narrow the list to a specific category. Click a category to filter; click again to clear and see all apps.
Combined search + filter — Use the search bar and category filter together for even more precise results. Clearing search preserves your selected category filter.
Details
Filtering is instant — no loading spinners or delays, even with large app catalogs.
Categories are pulled dynamically from your organization's catalog, so they always reflect what your admin has configured.
If a category has no apps, you'll see a helpful empty state instead of a blank screen.
The filter bar gracefully handles overflow when many categories are available.
Fully keyboard accessible.
Platforms
Available on macOS, Windows, and Linux (x86 & ARM).
June 9th, 2026
Improved
June 8, 2026
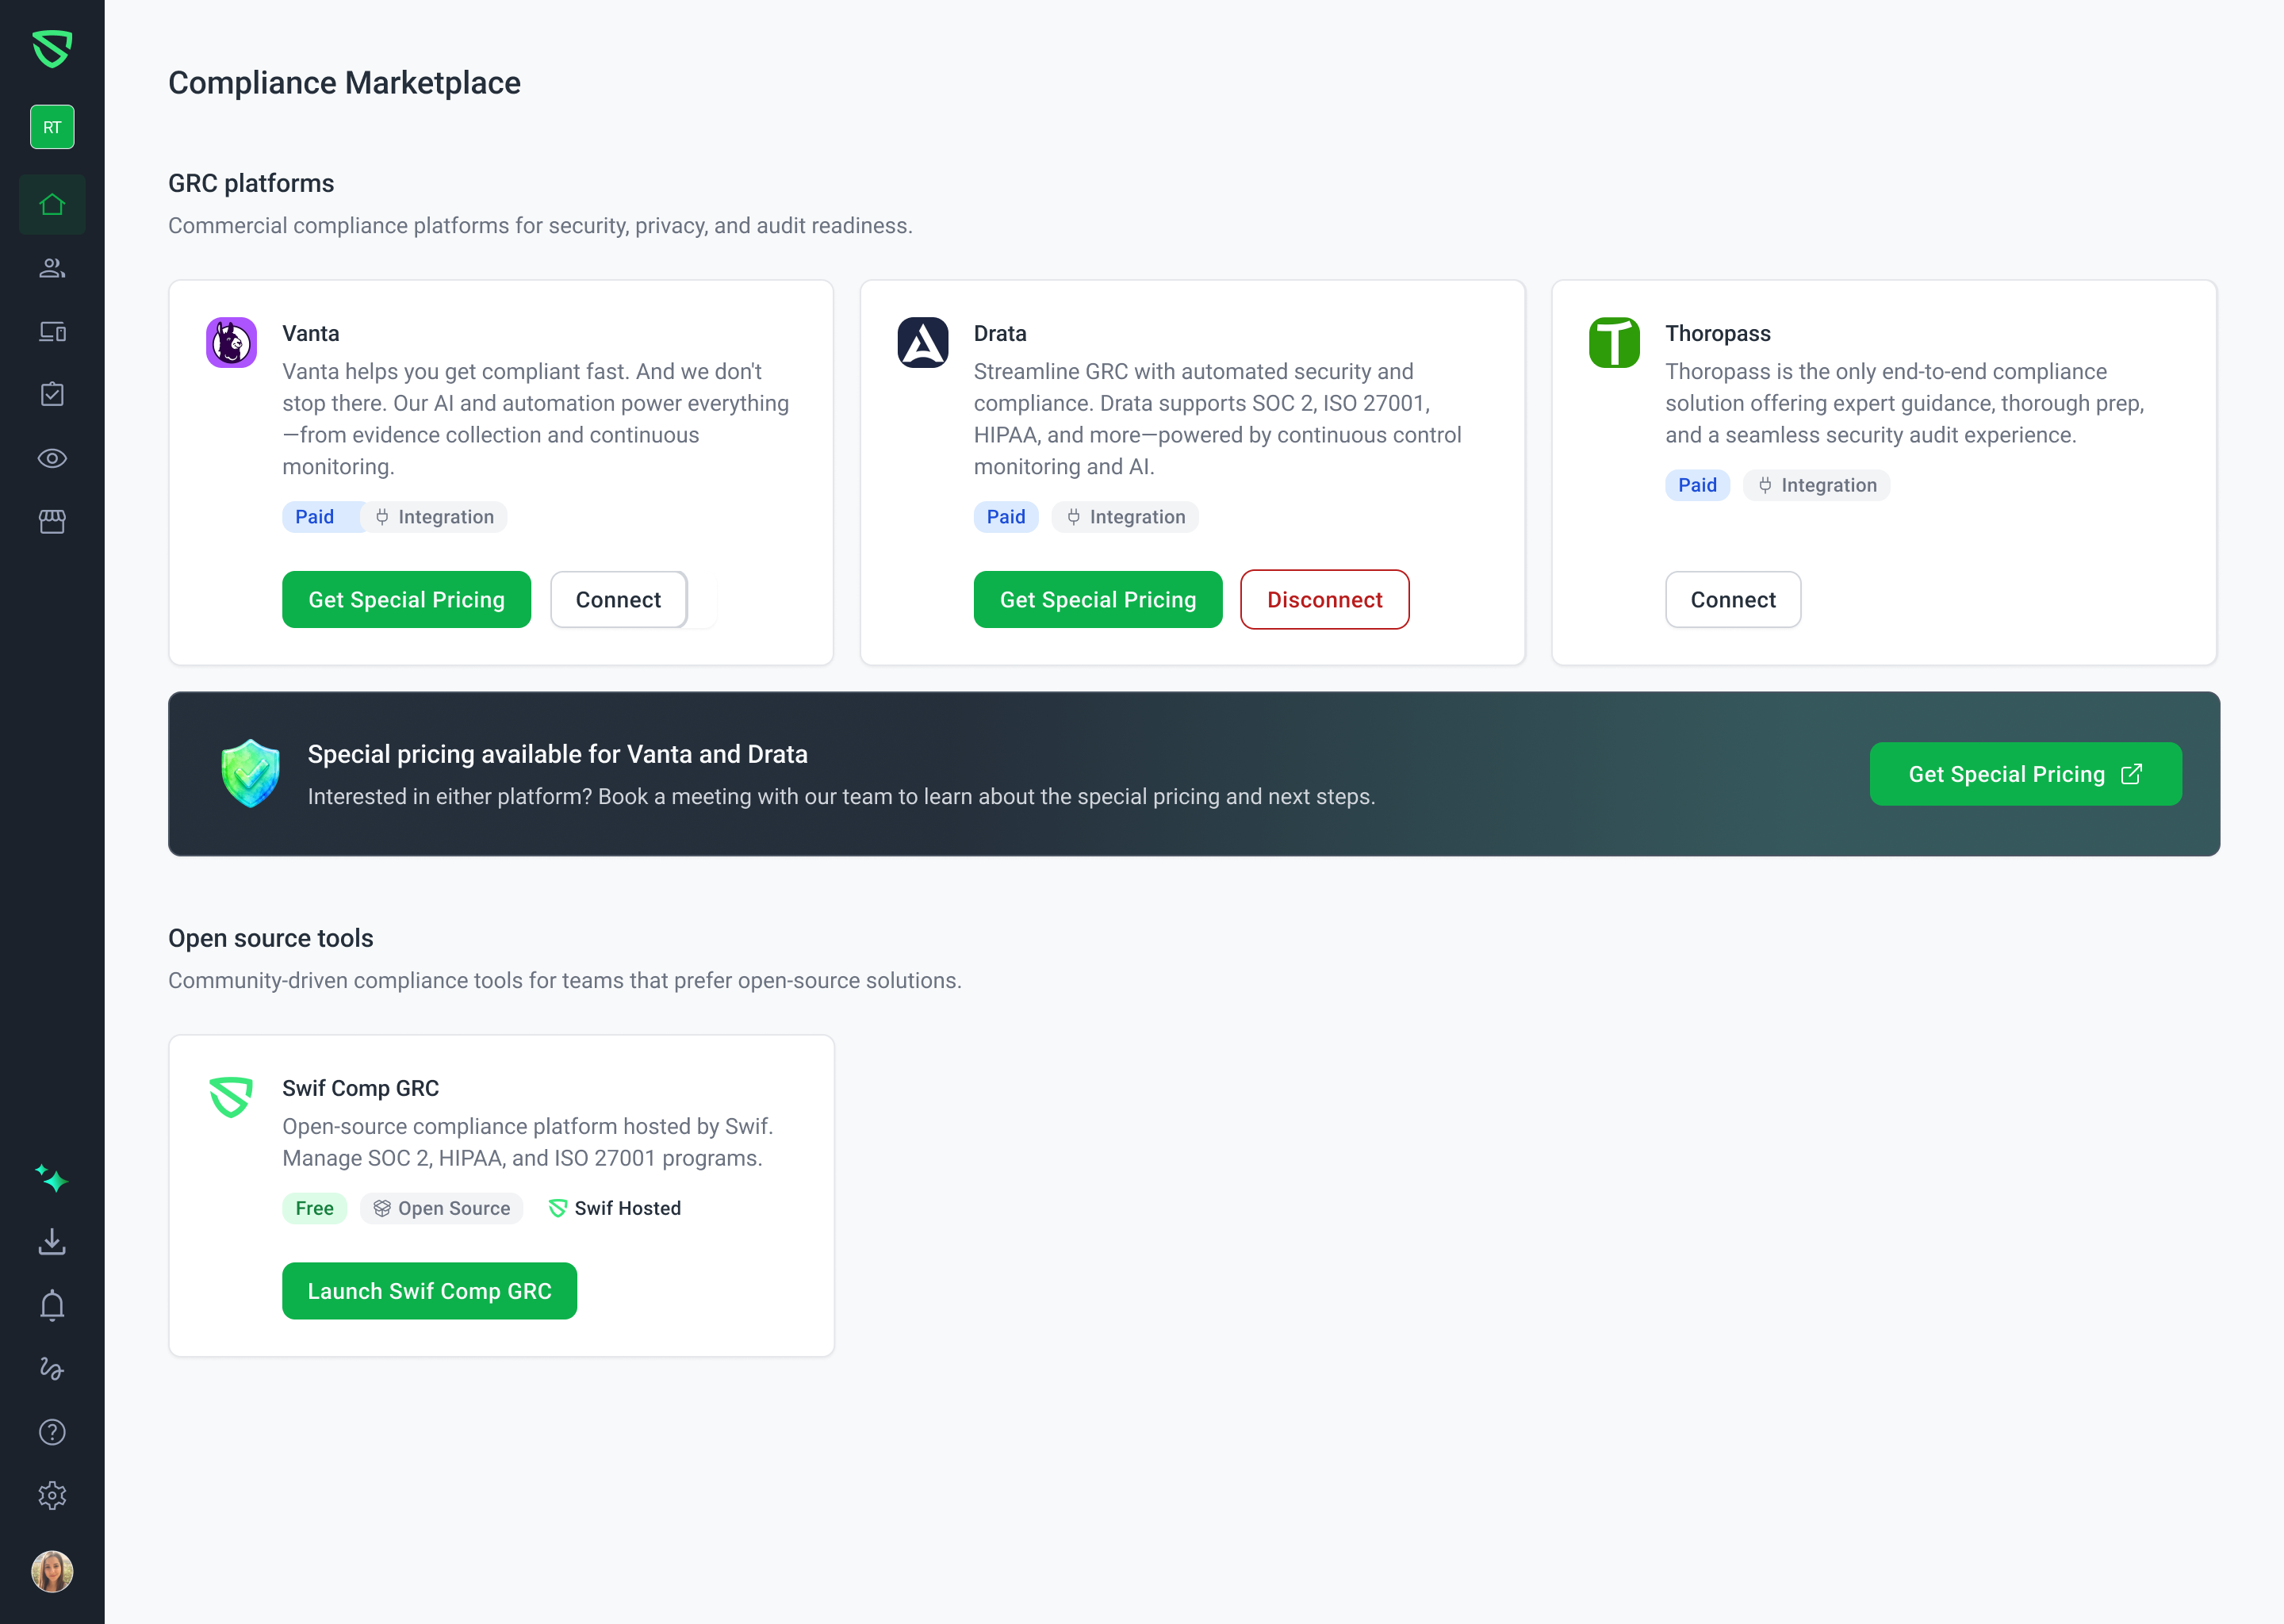
We've given the Compliance Marketplace a fresh look and made it easier than ever to explore the right compliance tools for your team.
What's New
Two Clear Sections: GRC Platforms & Open Source Tools
The marketplace is now organized into two distinct sections so you can quickly find what fits your needs:
GRC Platforms — Paid, fully managed compliance solutions with direct integrations (Vanta, Drata, Thoropass).
Open Source Tools — Community-driven, free compliance tools for teams that prefer open-source solutions.
Special Pricing Banner
Interested in Vanta or Drata? A new banner between the two sections highlights special pricing available through Swif. Click "Get Special Pricing" to book a meeting with our team and learn about exclusive rates and next steps.
Introducing Swif Comp GRC
What was previously known as "Comp AI" is now Swif Comp GRC — an open-source compliance platform hosted by Swif. The updated card makes it clear: this is a free, self-hosted solution for managing SOC 2, HIPAA, and ISO 27001 programs. The card now features Swif's own branding and logo to reflect our growing investment in making this a first-party experience.
Refreshed UI
The entire page has been rebuilt using our new design system for a cleaner, more consistent look and feel — including updated card layouts, buttons, and typography. Cards now display in a clean three-per-row grid on desktop and wrap responsively on smaller screens.
Streamlined Card Actions
We've simplified the buttons on each card:
Removed the generic "Visit Website" button.
Added a prominent "Get Special Pricing" button on Vanta and Drata cards, linking directly to booking.
Open source tools display a clear "Launch Swif Comp GRC" action instead.
Connect / Disconnect integration controls remain unchanged.
Why It Matters
These changes make it faster to evaluate compliance tools, clearer to understand what's free vs. paid, and easier to take advantage of special partner pricing — all without leaving Swif.
June 3rd, 2026
Improved
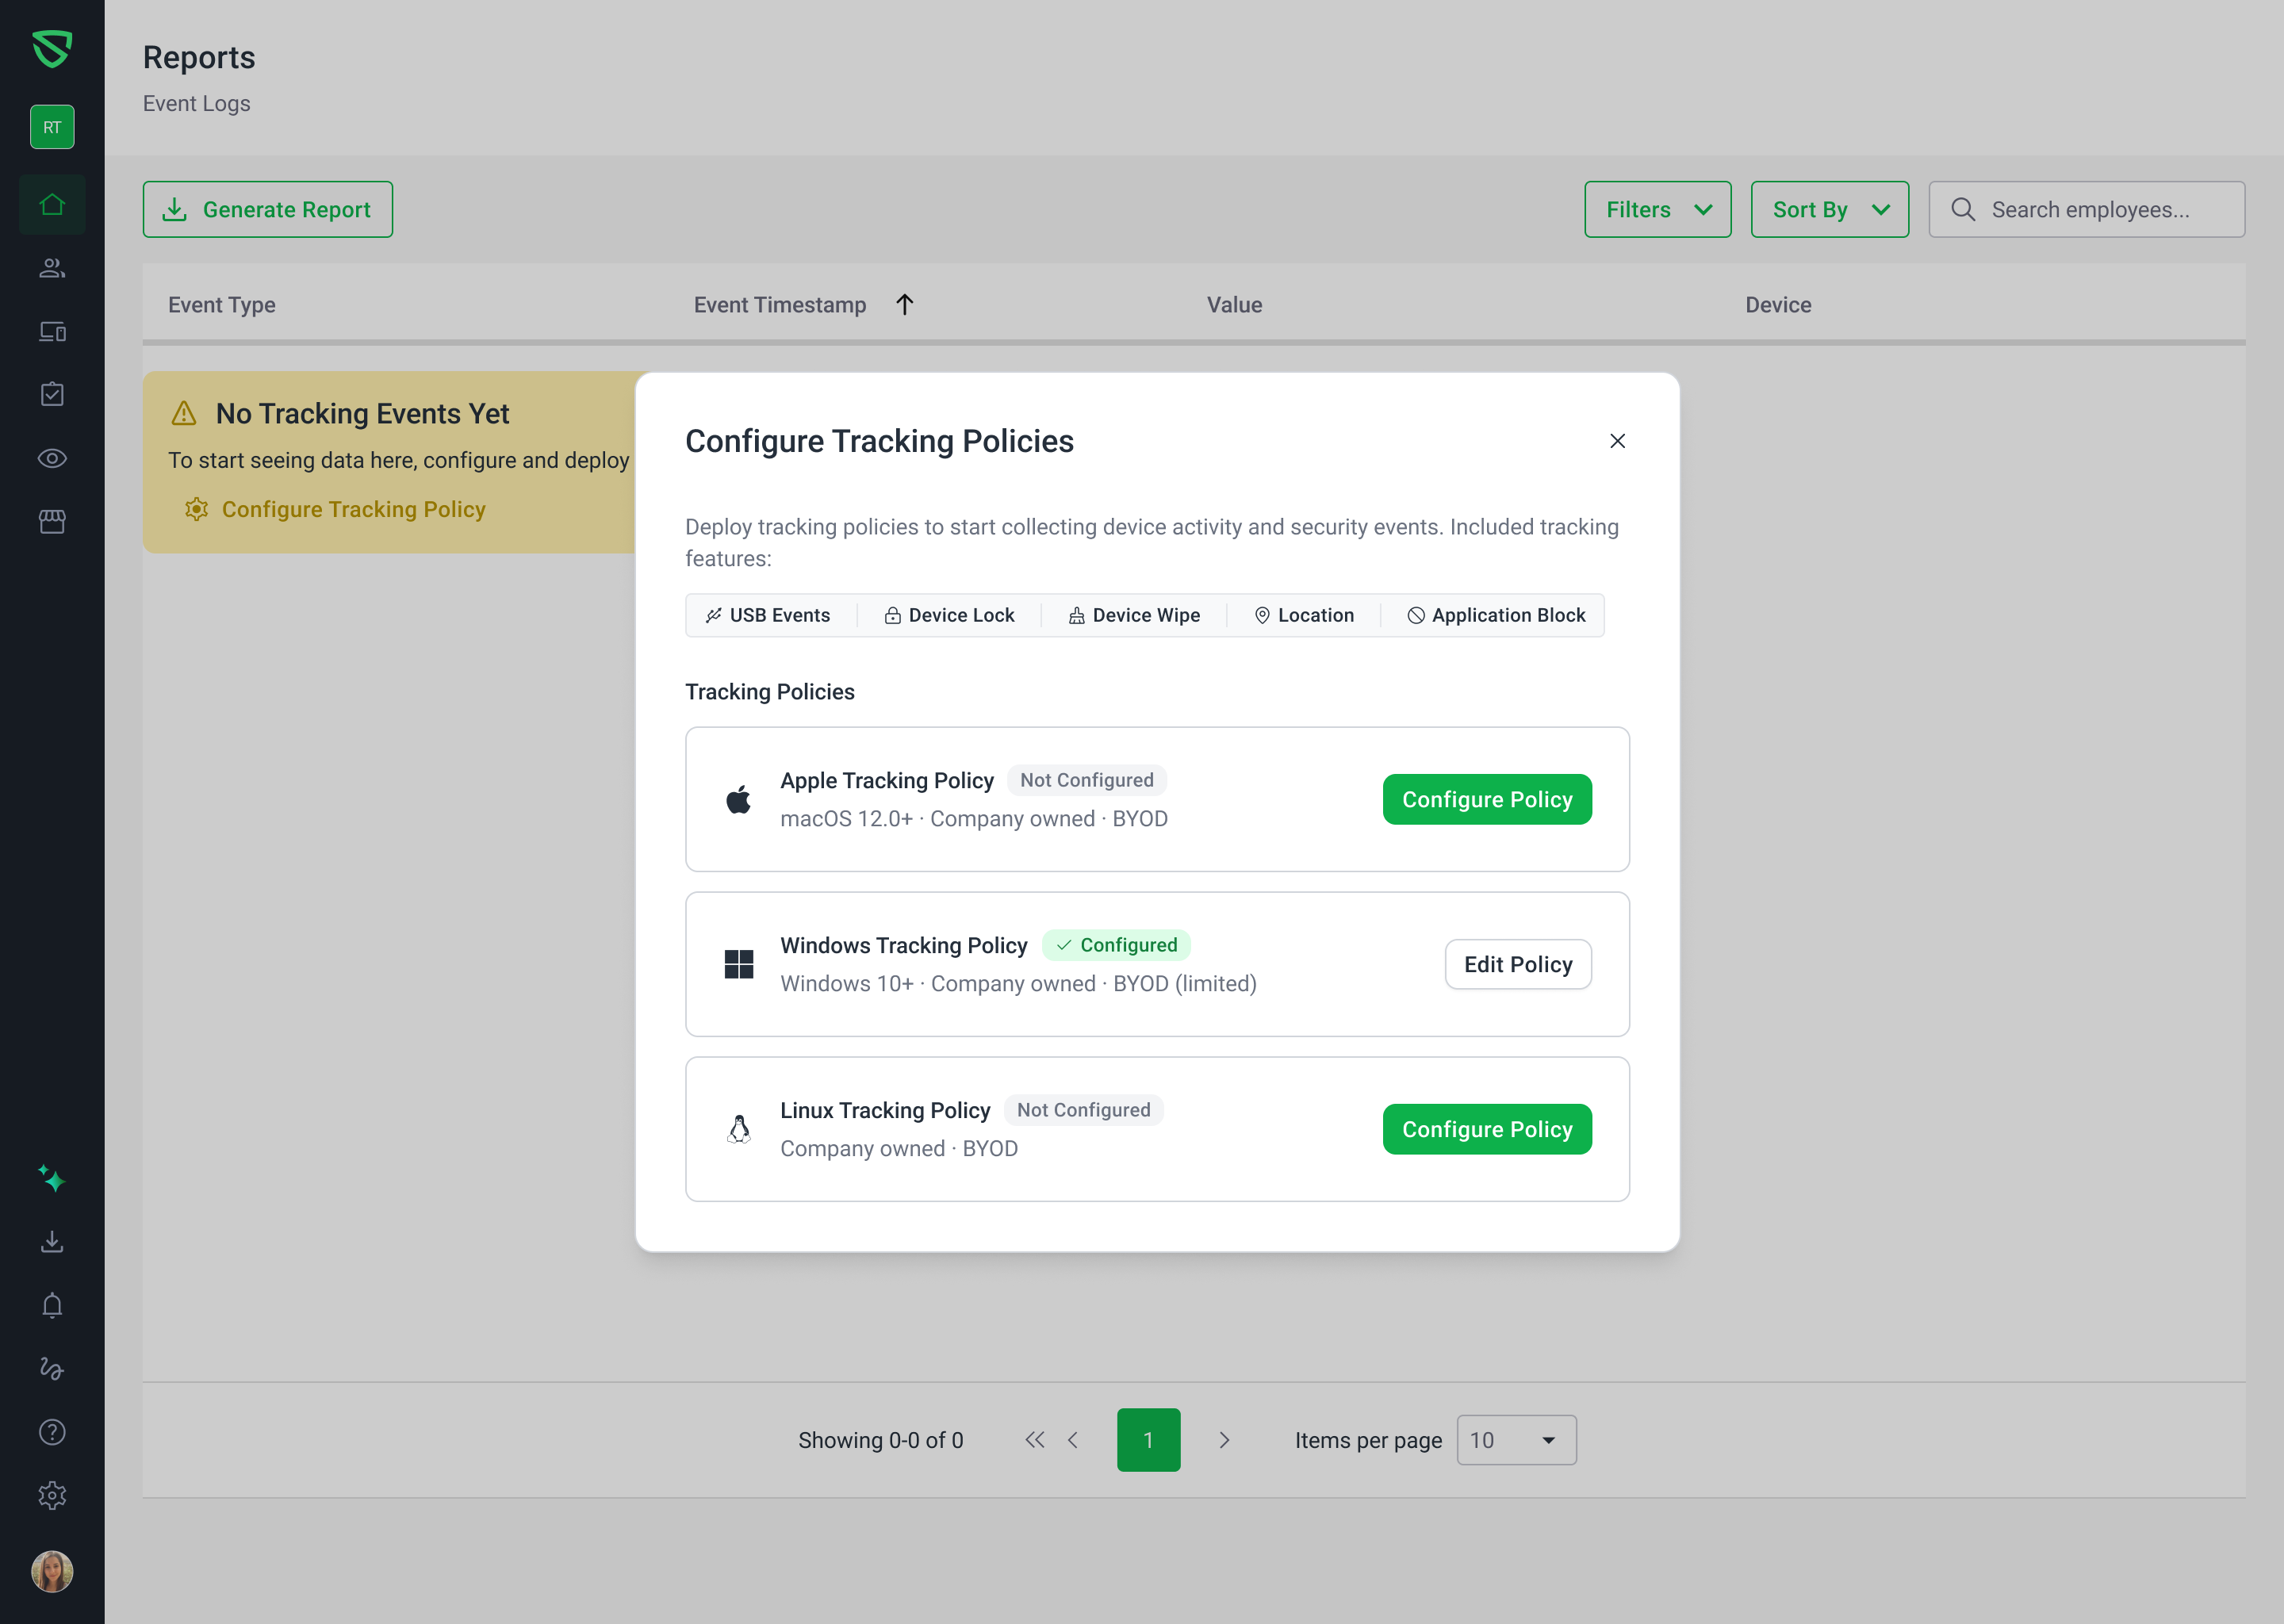
We've added guided setup and configuration awareness to the Event Logs page, making it easier for admins to deploy and manage Tracking policies across all platforms.
What's new
Guided setup for first-time configuration
When no Tracking policies are configured yet, the Event Logs page now displays a clear banner explaining that event data is generated by Tracking policies, along with a "Configure Tracking Policies" button that opens a guided setup modal.
Cross-platform Tracking policy status modal
The new setup modal shows the configuration status for each platform at a glance:
Apple Tracking Policy — macOS 12.0+ · Company owned · BYOD
Windows Tracking Policy — Windows 10+ · Company owned · BYOD (limited)
Linux Tracking Policy — Company owned · BYOD
Each row displays a Configured or Not Configured badge with a direct link to the relevant policy setup page. Included tracking features: USB Events · Device Lock · Device Wipe · Location · Application Block.
Partial configuration alerts
If only some platforms have Tracking policies configured, a dismissible info banner notifies admins that additional platforms can be set up to expand coverage. Clicking "Configure Tracking Policies" on the banner opens the same setup modal, highlighting which platforms still need attention.
Smart state handling
The setup banner is non-dismissible when no policies exist (ensures admins see the guidance).
The partial-configuration banner is dismissible and automatically hides once all platforms are configured.
Standard "no results" messaging is preserved when filters return empty but policies are active.
Why it matters
Previously, admins landing on an empty Event Logs page had no clear path to enabling tracking. This update bridges the gap between the reporting view and policy configuration, reducing confusion and accelerating time-to-value for new deployments.